Machine Learning Model On Docker Container
Hello Everyone!
Welcome you all to my article based on Task-01 of Machine Learning inside Docker(Linux World MLOps summer Training 2021)
{
Task Description
Task 01
👉 Pull the Docker container image of CentOS image from DockerHub and create a new container
👉 Install the Python software on the top of docker container
👉 In Container you need to copy/create machine learning model which you have created in jupyter notebook
👉 Create a blog/article/video step by step you have done in completing this task.
👉 Submit the link of blog/article or video
}

So, What is Machine Learning?
“ Machine learning (ML) is a branch of Artificial Intelligence (AI) that enables software applications to more accurately predict results without explicit programming. Machine learning algorithms use historical data as input to predict new output values. “
Okay, for those who don’t really know what is it, let me simplify the above statement for you.
“ Machine learning is the science of making computers learn and act like humans, and autonomously improve their learning over time, providing them with data and information in the form of actual observation and interaction ”
Now, What are Containers and What is Containerization ?
A container is nothing more than a small operating system that is started as a process. Generally, if you already have the operating system installed, you will notice that the operating system installation process will take a long time, that is, around 20 to 30 minutes (depending on the type of operating system and hardware). If you are in a QA / testing department, you have to install many operating systems and remove them to avoid wasting time. In today’s world, it all depends on the speed of development and agility of your products. To solve this problem, containerization emerged. They are so fast that they can boot the operating system in less than a second. There are many tools available for containers, but I will use Docker to start the container for this task.
Step 01: Check Docker is Installed or not.
# systemct1 status dockerStep 02: pull the centos Image from docker hub, :latest is used to pull the latest version of the OS available.
# docker pull centos:latestStep 03: Run the CentOS in interactive(-i) terminal(-t) form, using
# docker run -i -t centos:latest
Step 04: Install Python inside container.
# yum install python3Step 04: Install all the libraries your machine learning model depend:
pip3 install numpy pip3 install pandaspip3 install scikit-learn
Step 05: we create a new dataset manually in the “vi” editor,
“dataset.csv” contains 2 columns hrs and Marks. This shows the how much marks did student get on the basis of hours for which they study.
# vi dataset.csv 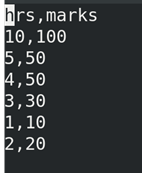
Step 06: Similarly, we create python file where we write code to train our model for prediction with the name of slr (simple linear regression)
# vi slr.pyWrite the following code for Simple linear regression model in the file “slr.py”

Simple linear regression is a regression model that uses a straight line to estimate the relationship between an independent variable and a dependent variable. Both variables must be quantitative.
The pandas library can help us to read the created dataset namely dataset.csv and store it in the variable df.
We take two variables x and y. x is the “independent variable ”and y is the “dependent variable”. Therefore, the hrs column is our x and the marks column is y, because the marks depends on the study time.
We can use this method to import Logistic regression model from
>>> sklearn.linear_model import LinearRegression We created the object name model of LinearRegression to train the model, model.fit accepts two parameters x and y. x should be in a 2D numpy array, but we are in the data frame, so to convert to a matrix, please use “.values”, and then convert from a 1D pandas.series to a 2D numpy.ndarray , “reshape ( -1,1)”. So model.fit(x, y) trains the model and prepares to make predictions.
Step 07: To run the python file we use the command this will also show we the prediction of a person who study 6.5hrs and get the approx. 66 marks.
# python3 slr.py
We use joblib to save the train model. So that in future we don’t require to run the whole program again. So after we run the “slr.py” file the joblib.dump(model , ‘slr_model.pk1’ ) will save the model and create a file named as “slr_model.pk1”

Step 08: we use the following command to open vi editor and create a new python file named as “saved_model.py”
# vi saved_model.pyInside the file,

In “saved_model.py”, we load the slr_model.pkl using joblib.load and store in saved_model variable. And we use this for Prediction saved_model.predict([[6.5]]). Here, 2 Square brackets represents the 2D array.

So, finally we can see the prediction from our saved model.
Task Done Successfully!
That’s it for this blog, Hope you liked it!!!!
If you want to connect, Below is my LinkedIn profile-
https://www.linkedin.com/in/mohit-mathur-1803/
